So you will definitely need a set of pressure gauges to diagnose this symptom. Refrigerant is a gas that changes states through pressure which is also how it changes temperature. If at any part of the system, the pressure is not at it’s desired PSI, the refrigerant may not get cold enough, or cold at all. Click on the image to get a detailed description of the gauges needed to check your system.
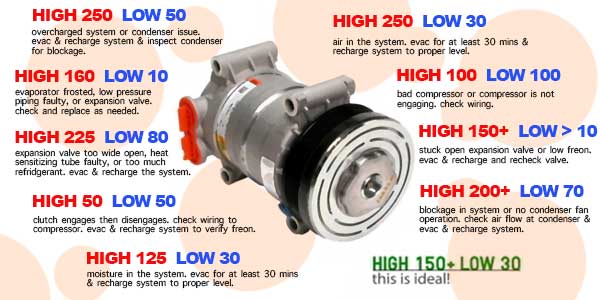
First you will need to check the pressures at idle and record both HIGH and LOW side pressure readings. These pressures will vary depending on ambient temperature (temperature of the outside atmosphere), but ideally, you will want to see your low side pressure between 30-40 psi and your high side pressure between 150-175 psi. If one or both are out of that spec, see the options below to start looking further into your problem.
H – too low
L – too low
System under charged or too much oil
Check visually for any leaks in the system. If you are low on refrigerant, it leaked out somewhere. Look for oil residue around the hose ferrules, fitting connections at the compressor, condenser, and evaporator or expansion device. If no obvious leak is found, recover the refrigerant and replace the service ports or valves, evacuate and recharge the system, and add dye in case there is another leak. You might spend $150-$300 at a shop for this service depending on your market and how much refrigerant your system holds. ***NOTE: It is illegal to vent R134A refrigerant into the atmosphere. Evacuation and recharge should be performed by a licensed professional with the proper machinery.***
Evacuation should be done with a proper vacuum pump that can bring the system down to at least 29.75 “hg (inches of mercury) or more and hold it there for at least 30 mins. Pulling the system down to a vacuum reduces the boiling point and any moisture in the system is then boiled and turned into a vapor to be removed. This also ensures that all the air has been removed from the system. Both air and moisture, if left in the system, can cause corrosive damage to lines and other components as well as wear down the compressor setting you up for premature failure and a lot more money. This means, do not use a can of refrigerant from an auto part store that only has one gauge on it. This is not the proper way to care for your A/C system! You need gauges, a vacuum pump, and a scale to do this correctly. If you do not have these things, take your car to a shop.
Once the vacuum is complete, let it sit for about 5 minutes to see if you lose vacuum pressure. This will indicate that you still have a leak somewhere. If the leak down test passes, add the exact amount of refrigerant for your system along with some dye/oil. Your underhood sticker should inform you of how much refrigerant your system holds and what type of oil to use. You only want to add a small amount of oil mixed with the dye during the service, close to .5oz will be sufficient.
When done, run the vehicle with the gauges still connected and record new pressures. If there is still an issue, please go back to the DIAGNOSING your AC page HERE. If it is blowing cold now… go enjoy the cool air!
H – too high
L – too high
System overcharged or air in the system, condenser fins blocked, or fans are inoperative.
Check and make sure the condenser fan is turning on. Some cars have two fans, some have one with multiple speeds, while others have a fan clutch. Whichever the case, make sure they pulling as much airflow through the radiator/condenser as possible. Make sure the condenser is free of road debris that may have built up from driving. Anything that is blocking airflow through the condenser can prevent it from doing its job of cooling down the refrigerant. Clean condenser, repair fans if a fault is found, and retest. Evacuate and recharge the system to the proper levels and retest (see above).
If after the evacuation and recharge you are finding yourself with the same readings, you likely have a blockage in the system. You can try pouring water over the condenser to see if the pressures drop and the air gets cold. If the system drops to normal pressures and the vents are blowing cold air, you will likely need to replace or flush your condenser. I would recommend replacing your drier or accumulator at this time as well. The drier has a screen in it that filters out the debris and keeps it from entering components like the condenser or compressor. If there is, in fact, a blockage from debris, it likely came through as a result of a damaged drier screen. Replace items, evacuate and recharge, and retest.
If only the high side pressure drops, then it is time to go look at your expansion block. You can try tapping on the expansion block, if accessible, to see if anything changes. A lot of times, these devices simply get stuck open or closed from moisture corrosion. If you are looking at pressures around 225psi on the high and 80psi on the low, it would be a safe bet to replace the expansion device, evacuate and recharge system, and retest.
H – OK
L – too low
Evaporator frosting or expansion valve faulty.
Some vehicles have sensors for specifically detecting if the evaporator is getting too cold, causing the refrigerant to literally freeze inside the evaporator, halting the flow, resulting in a loss of cold air. Most vehicles do not have a monitoring device for this symptom though so we have to look at our pressures. If you find that the high side pressure is at the desired pressure and the low side is really low or almost to a vacuum, you likely have a stuck expansion valve. Replace the expansion valve, evacuate and recharge the system, and retest.
H – too low
L – too high
Low refrigerant level or failing compressor
With the gauges connected, rev the engine to 2000 RPM and watch what the pressures in the AC system do. Do they move closer together (high side gets lower while low side gets higher) or do they move away from each other? If they move away from each other, start with evacuating and recharging the system and retesting.
If they move together, you have a weak compressor and it is recommended to replace the system. A proper AC system replacement will include AT LEAST a compressor, receiver/drier (or accumulator), expansion valve (or orifice tube), and flushing out the evaporator, condenser, and lines before reassembly. Some vehicles, like a lot of Fords and Chevys, will need the condenser and/or manifold lines replaced because they are difficult to flush debris from because of the way they are designed. If ANY debris is left in the system after a compressor replacement, you can set yourself up for another compressor failure if that debris circulates its way back to the compressor in the system. Some systems, the drier is part of the condenser, like a lot of Hondas. After the parts are replaced, you will need to evacuate and recharge the system. See above for proper procedure. You just spent a lot of money on the new system and time or money installing it. Make sure this job is done right. “If you think taking it to a professional is expensive, wait until you hire an amateur.”
These are just some of the things that could be wrong. Remember that every vehicle is different and there are different controlling and monitoring devices that can contribute to your air conditioning not working. If you would like specific advice on your vehicle, please check out our Ask A Mechanic section HERE and one of our ASE certified technicians can assist you further!


