How To Do Your Own Headlight Restoration For Under $20

0
0

Headlight Restoration That’ll Get Your Headlights Looking Brand New Forever!

The problem with foggy headlights

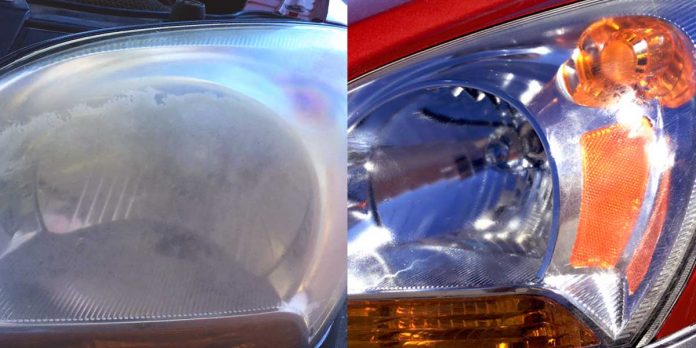
Headlights that are covered in yellow oxidation are not only unattractive and make your car look old or dirty, but it is also a safety issue when driving at night. Light refracts off the oxidation and dulls the brightness and extent of the light beam hindering your ability to see further when driving at night. When comparing a brand-new headlight lens to an old worn-out one, you can see up to 30 feet further. When you check with automotive repair shops and detail and body shops, you’ll find that restoring your headlights can cost $80 or more, which is well worth the price if you don’t want to do the work yourself. When done by a professional, most will warranty them for life because they should never fade again. If you’re looking to do the elbow work yourself, keep reading and I’ll tell you how you can do it for under $10 and never have to do it again.

First get all the supplies that you will need.

You will need: 600-800 grit sandpaper and 1500-2000 grit sandpaper, rubbing alcohol or alcohol wipe, a clean microfiber towel, A roll of painters tape, newspaper, and Dupli-Color wheel or high temp clearcoat spray. Or you can buy a kit like this one from Sylvania that has everything you will need in it:

First step clean off the area of the headlight.

Remove all bugs and dirt and debris from the lens. You will want a clean surface before the next step.

Wet sanding

Take a spray bottle or a wet rag and soak the lens and the sandpaper. If the lenses in really bad shape start with the heavier grit sandpaper her. If it’s not too bad you can skip that step and just start with the finer grit sandpaper. You will want to sand the area vigorously. This will take about 10 minutes per lens to do it correctly depending on how bad they were to begin with. Be sure to keep the area and the sandpaper wet so that you do not burn the plastic while standing. Sand until all inconsistencies and roughness is gone from the lens and it is smooth and foggy equally over the entire surface area. Always finish with the 1500 grit sandpaper.

Prep for clear coat

Once you’re finished sanding, tape off all the bumper and fender area around the headlamp to protect against overspray. Use the newspaper to help cover more area and use less tape. Use the rubbing alcohol with the microfiber towel, or you can use an alcohol wipe, and wipe both lenses down and let it dry. Do not rub the towel back over the lens again to dry. The alcohol will evaporate quickly.

Now we are going to apply the clear coat

Hold the can of clear coat about 5 to 6 inches away from the lens and spray and an even pattern back-and-forth. Be sure to cover the entire lens surface area as equal as possible without applying too much to avoid dripping. The lens should now look pretty good but not great. Move the vehicle into the sunlight and make sure the sun is hitting the lens. Give it about 20 minutes to cure in the UV light from the sun. It will take a full 24 hours to completely cure.

SHARE

NO COMMENTS

LEAVE A REPLY